Well control basics start with one hard truth: the earlier a kick is caught, the more routine the response is. This guide walks through kick detection and BOP procedures the way a good driller would explain them on the rig floor — no shortcuts, no fluff.
Key Takeaways
| Question | Answer |
|---|---|
| What is a kick? | An influx of formation fluid into the wellbore when formation pressure exceeds hydrostatic pressure. See the full well control and kicks reference. |
| What’s the first response to suspected kick signs? | Stop and perform a flow check immediately — don’t wait for confirmation from surface pits alone. |
| Hard shut-in or soft shut-in? | Company policy dictates this, but both follow the same core BOP sequence. See BOP types, function, and pressure ratings. |
| Driller’s Method vs Wait and Weight? | Driller’s Method circulates the kick out first with original mud, then kills the well on a second circulation. Wait and Weight kills in one circulation with weighted mud. |
| What accumulator pressure should a BOP hold? | Typically 3,000 psi on the accumulator, with manifold pressure around 1,500 psi. |
| Where do I calculate kill mud weight? | Use the kill sheet calculator once SIDPP is recorded and the well is shut in. |
| How often should BOPs be tested? | Weekly function tests at minimum, plus pressure tests per regulatory and operator requirements. |
What Is a Kick? The Foundation of Well Control Basics
A kick happens when formation pressure exceeds the hydrostatic pressure exerted by the mud column, allowing formation fluid — gas, oil, or water — to enter the wellbore.
This isn’t theoretical. Every foot drilled changes the pressure relationship between the formation and the mud column, which is why mud weight management and the mud weight window sit at the center of every well control conversation.
Once formation pressure wins that battle, fluid moves into the annulus and starts migrating toward surface. Left unchecked, that influx expands as it rises — especially gas — and the situation escalates from a kick to an uncontrolled blowout.
Well control isn’t a single skill. It’s kick detection, mud weight discipline, and BOP readiness working together, and a weak link anywhere in that chain increases risk everywhere else.
Kick Detection: What You Are Actually Watching For
Early detection depends on crews watching the right indicators continuously, not just when something feels off. The signs fall into two groups, and the distinction matters more than the list does.
Volume signs — pit gain, and flow out exceeding flow in — mean something has entered the wellbore that you did not pump into it. These are the ones that confirm an influx, because mud does not appear from nowhere.
Pressure and drilling signs — a drilling break, falling pump pressure with rising stroke rate, gas-cut mud — mean formation properties have changed. These are warnings that conditions could produce a kick, not proof that one has started.
That is why a pit gain is treated more urgently than a drilling break. One is evidence, the other is a forecast.
Each of the individual indicators is broken down, with the reasoning and the numbers, in five warning signs of a kick. Together — especially flow increase and pit gain — they demand an immediate flow check.
Conducting a Flow Check: The First Response
A flow check is the fastest way to confirm or rule out an influx, and it should never be delayed once warning signs appear. The procedure is straightforward: stop the pumps, open the flowline to the trip tank or check the flow indicator, and observe.
If the well continues to flow with pumps shut down and no mechanical siphoning effect present, that’s a confirmed kick. At that point, the crew moves directly into the shut-in procedure — no further verification, no second-guessing.
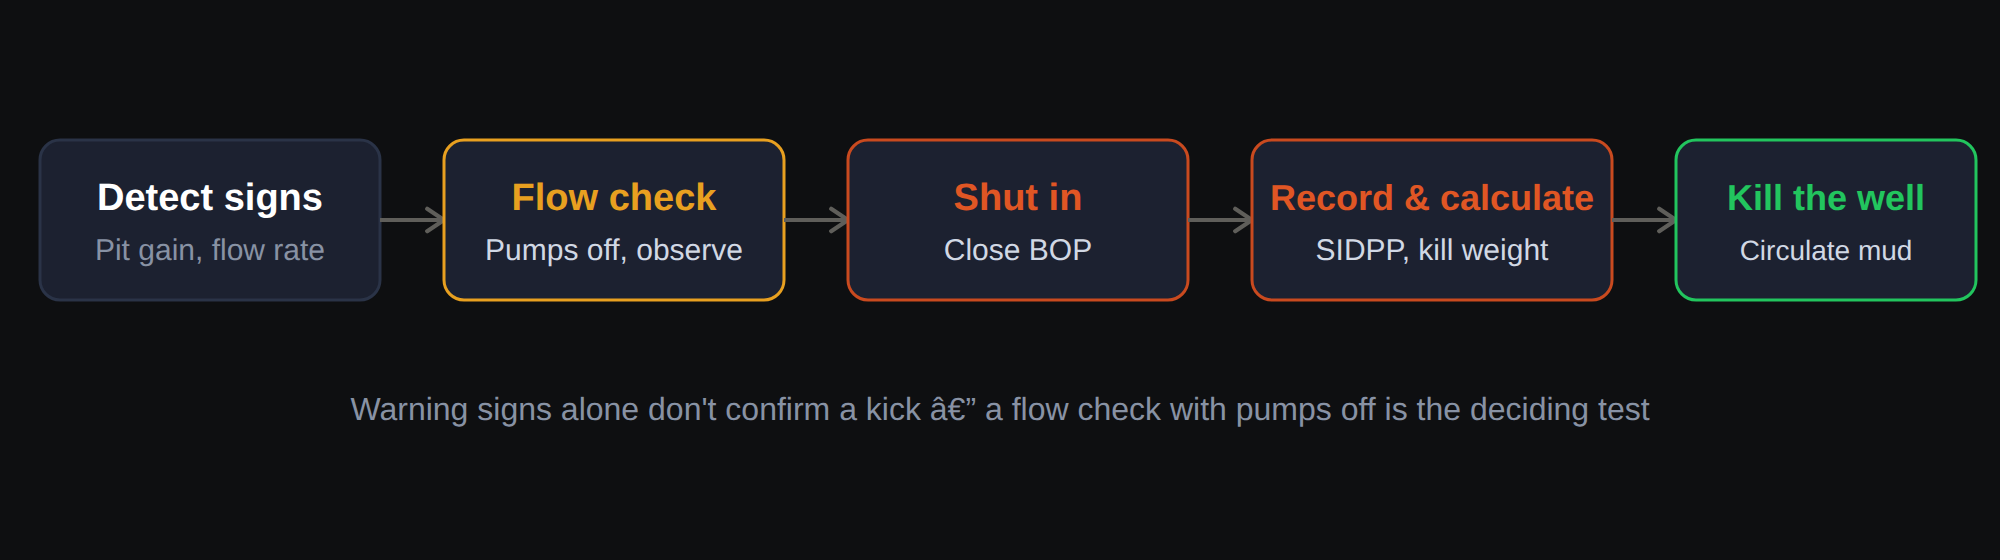
Worth knowing: well control breaks down into two components — an active component (continuous drilling fluid pressure monitoring) and a passive component (the blowout preventer itself, sitting ready if the active monitoring misses something).
Shut-In Procedures: Hard Shut-In vs Soft Shut-In
Once a kick is confirmed, the crew executes a shut-in sequence based on company policy: hard shut-in or soft shut-in.
Hard shut-in closes the BOP first, then opens the choke line. This traps pressure fastest, minimizing influx volume, but produces a sharper pressure spike that some operators want to avoid on weaker formations.
Soft shut-in opens the choke line first, then closes the BOP, easing into shut-in pressure more gradually. This is often the preferred method where formation integrity or casing shoe strength is a concern.
Regardless of method, once shut in, the crew records Shut-In Drillpipe Pressure (SIDPP), Shut-In Casing Pressure (SICP), and pit gain. These numbers feed directly into kill calculations — run them through the kill sheet calculator once SIDPP is confirmed.
If H₂S is a possibility in the formation being drilled, shut-in procedure changes further — crews need to reference H₂S detection and safety protocols before opening any lines to surface.
BOP Stack Components and How They Operate
The blowout preventer is a high-pressure valve system installed on top of the wellhead, capable of sealing the wellbore in seconds.
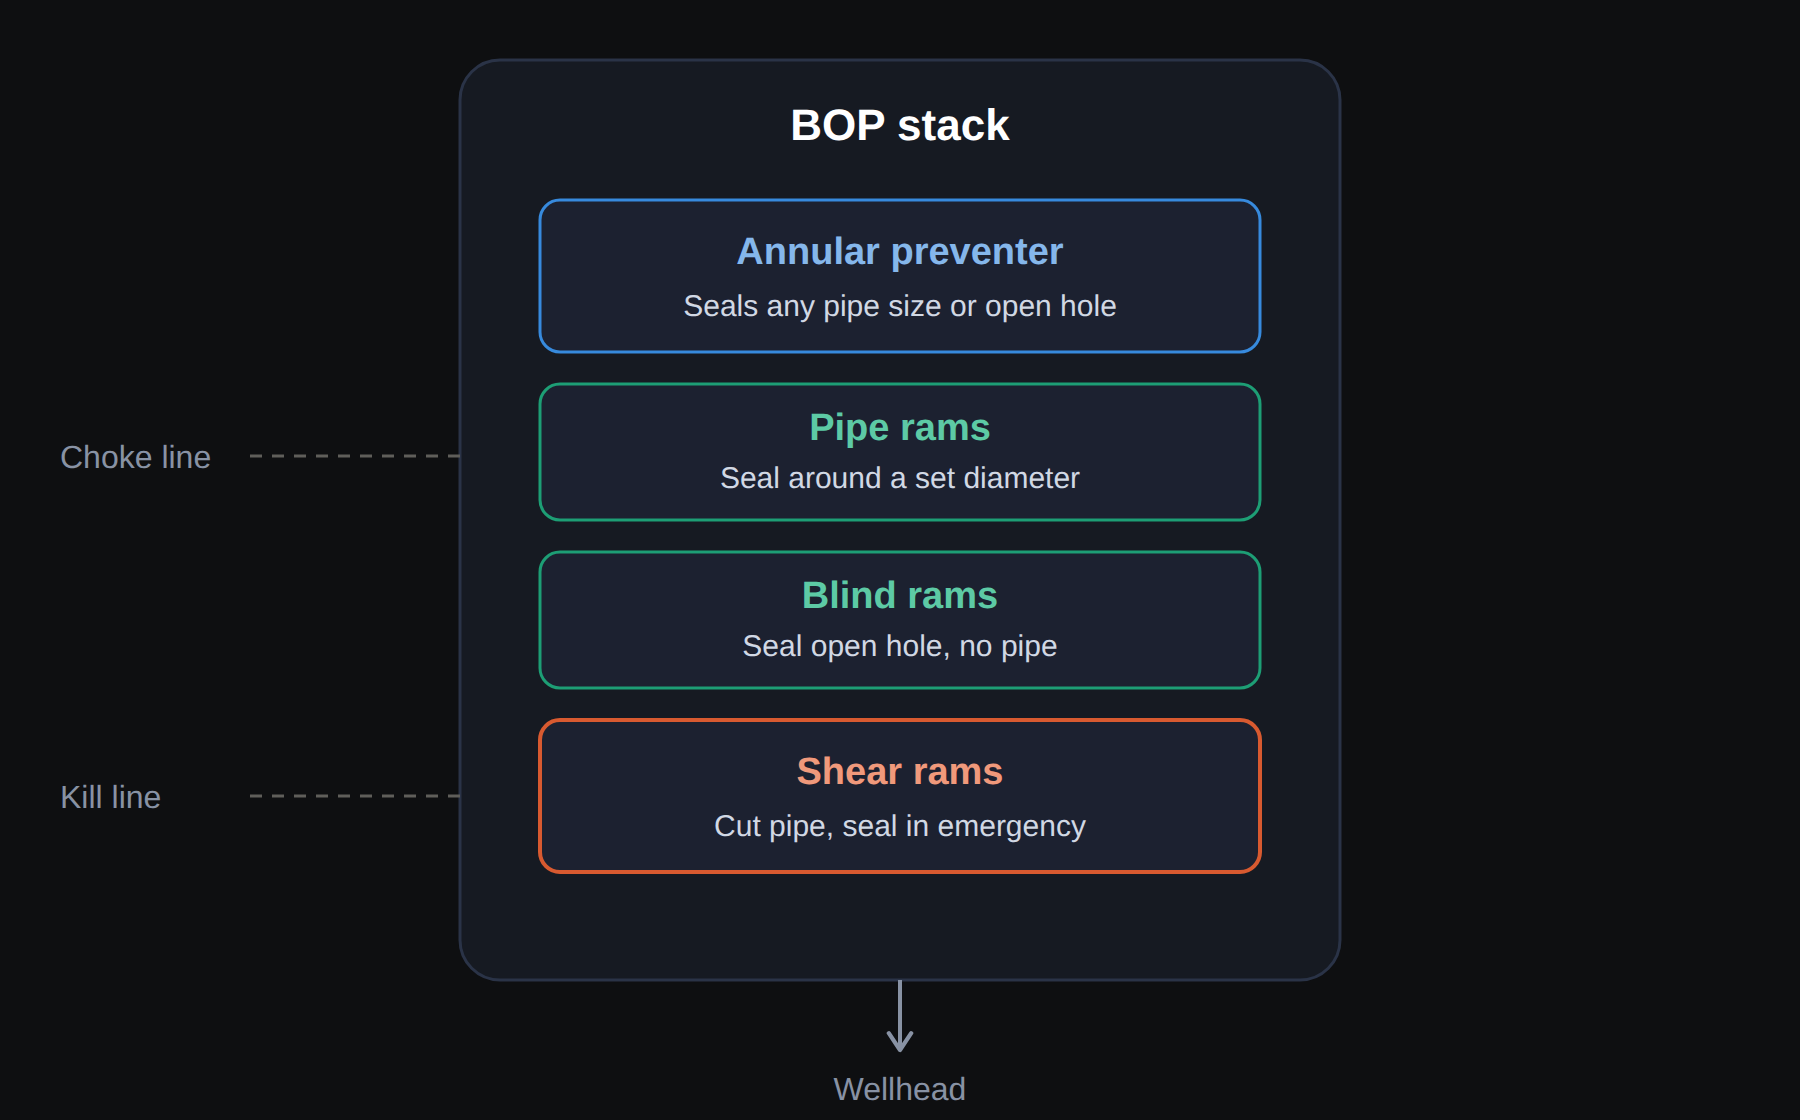
A standard BOP stack, from top to bottom, typically includes:
- Annular preventer — seals around any shape or size of pipe, or fully closes on open hole
- Pipe rams — seal around a specific pipe diameter
- Blind rams — seal open hole when no pipe is in the wellbore
- Shear rams — cut through drill pipe and seal the wellbore in an emergency
Choke and kill lines run off the side of the stack, allowing circulation while the BOP remains closed — the entire basis for both kill methods discussed below.
Whether you’re working a surface stack on a land rig or a subsea stack on a semi-submersible or drillship affects response time and redundancy requirements considerably, tied directly to the rig type you’re working on.
A stack that isn’t tested to schedule isn’t a stack you can trust in a live kick. Ram configurations, pressure ratings, choke and kill line specifications, and the daily pressure figures crews verify at the start of every tour are all on the BOP equipment page.
Why There Are Two Kill Methods
Once the well is shut in and SIDPP, SICP and pit gain are recorded, someone has to choose between the Driller’s Method and Wait and Weight. Both are taught in IWCF and IADC certification, and the side-by-side comparison is on the well control reference.
What is worth understanding here is why the choice exists at all. It is a trade between two risks.
Driller’s Method starts circulating immediately, so the influx begins moving out sooner — but it needs two full circulations, which means longer overall with the well in a critical state. Wait and Weight spends time mixing kill mud first, leaving the influx in the hole longer, but then kills the well in one circulation.
So you are choosing between getting started sooner and finishing sooner. Which matters more depends on rig capability, mud plant capacity, how much the formation will tolerate, and company policy. That is precisely why the decision sits with a certified well control supervisor rather than a rule of thumb — there is no answer that is correct on every well.
Kill Sheet Calculations: Getting the Numbers Right
Kill sheet math is not something to eyeball under pressure. It relies on four core calculations:
- Formation Pore Pressure (FPP) — derived from SIDPP and original mud weight
- Kill Mud Weight (KMW) — the weight required to balance formation pressure with margin
- Initial Circulating Pressure (ICP) — based on slow pump rate pressure plus SIDPP
- Final Circulating Pressure (FCP) — the target pressure once kill mud reaches the bit
The kill sheet calculator runs these formulas once you input original mud weight, SIDPP, TVD at bit, and slow pump rate pressure. That said, it’s a reference tool, not an operational authority — real decisions during an actual well control event must come from a certified well control supervisor following company-approved procedure.
Slow pump rate pressure itself needs to be recorded regularly, at multiple pump rates, so it’s current and accurate when you actually need it during a kill.
Mud Weight Window: Preventing Kicks Before They Start
The best kick response is the one you never have to execute, and that starts with staying inside the mud weight window.
This window is the range between pore pressure — below which you risk a kick — and fracture pressure, above which you risk losing circulation into the formation. Both limits shift with depth, which is why casing points are chosen at specific depths, covered further in the casing design guide.
The hydrostatic pressure calculator lets crews check mud weight against TVD, pore pressure, and fracture gradient before problems develop, giving an instant safe or unsafe status.
Equivalent Circulating Density (ECD) also matters here. Circulating adds friction pressure on top of static hydrostatic pressure, meaning a mud weight that looks safe static can push past fracture gradient while pumping — all of which ties back to the broader mud weight and hydrostatic pressure fundamentals every driller needs cold.
Crew Readiness: Training, Certification, and the Bigger Picture
Kick detection and BOP procedures aren’t skills you pick up once and forget. Well control certification requires periodic recertification precisely because procedures, equipment, and regulatory standards evolve.
If you’re building or advancing a career on the rig floor, understanding where well control certification fits into career progression matters — the certifications overview breaks down what’s required and how it stacks against other rig floor qualifications.
Well control also doesn’t exist in isolation from the rest of rig operations. Drill string integrity, covered on the drill string components page, affects everything from shear ram function to pressure transmission during a kill. Structural repairs on rig floor equipment, including BOP stack components and choke manifolds, often require welding work performed to strict pressure-vessel standards — covered in the welding fundamentals section.
For a broader look at how well control fits into the full drilling sequence, from spud to total depth, the drilling operations overview and rig equipment overview provide the surrounding context. And if you’re comparing tools before your next well, the full drilling calculators suite covers hydrostatic pressure, kill sheets, and mud weight windows in one place.
Conclusion
Well control basics come down to three disciplines working together: recognizing kick warning signs early, executing shut-in and BOP procedures without hesitation, and running accurate kill calculations before circulating. This isn’t optional knowledge — it’s the difference between a routine shut-in and a catastrophic event.
Every crew member on the rig floor, not just the driller, needs to know these signs and steps cold. Review your company’s well control policy, confirm your BOP pressure checks daily, and never treat a kill sheet calculator as a substitute for your certified well control supervisor’s judgment during an actual event.
Frequently Asked Questions
What are the first signs of a kick on a drilling rig?
The earliest signs of a kick include increased flow rate out without a matching pump rate change, pit gain, and a drilling break. Any of these should trigger an immediate flow check as part of standard well control procedure.
What’s the difference between hard shut-in and soft shut-in?
Hard shut-in closes the BOP before opening the choke line, trapping pressure fastest but creating a sharper pressure spike. Soft shut-in opens the choke line first, then closes the BOP, easing pressure buildup more gradually for sensitive formations.
Is the Driller’s Method or Wait and Weight Method better for well control?
Neither method is universally better — the choice depends on rig capability, mud mixing capacity, and formation sensitivity. Driller’s Method uses two circulations with original mud first, while Wait and Weight kills the well in one circulation using pre-weighted kill mud.
How often should BOP equipment be tested?
BOPs require function testing at least weekly, plus full pressure testing on a schedule set by the operator and applicable regulatory body. Daily pressure checks on accumulator, manifold, and annular systems remain standard practice on active rigs.
What is SIDPP and why does it matter for kill calculations?
SIDPP (Shut-In Drillpipe Pressure) is the pressure recorded on the drillpipe once a well is shut in following a confirmed kick. It’s a required input for kill mud weight and circulating pressure calculations, and it must be recorded accurately before any kill sheet math can proceed.
Can a kill sheet calculator replace a well control supervisor’s decision?
No — a kill sheet calculator is a reference tool for checking kill mud weight and circulating pressure formulas, not an operational authority. Real well control decisions during an actual event must always come from a certified well control supervisor following approved company procedure.
Why does mud weight matter for preventing kicks in the first place?
Mud weight creates hydrostatic pressure that must stay above formation pore pressure to prevent influx, while staying below fracture pressure to avoid lost circulation. Staying inside this mud weight window at every depth is the primary defense against kicks, making it as central to well control basics as BOP procedures themselves.